So my son's [Nintendo 3DS](https://www.nintendo.com/3ds) wi-fi stopped working a few weeks ago, and I finally had time to take a look at it to see if there was anything that could be done. The situation was that it would work fine playing games or doing anything not needing wi-fi access, but as soon as you'd turn on the wi-fi switch, after about 10 seconds, the screen would go black and display the message:
- Error Message: Error Has Occurred. Hold down the POWER Button to turn the power off.
- "Hold down the POWER button to power off the system, Continue to use the system to see if the error reoccurs, General system stability can be improved by applying the System Update that was made available on March 24th, 2011. Try applying this System Update and see if the issue improves."
TL;DR the wi-fi card works itself loose and only needs to be reseated for it to work again. Knowing this, I got down to business and started ripping this sucker apart.
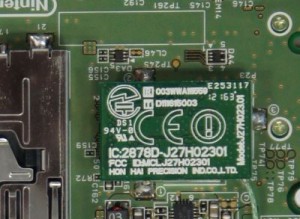
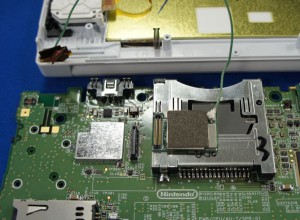
To get started you’ll need a Philip #00 screwdriver, which is the same size you need if you want to rip your Macbook Pro apart (look for a future post on that). Now, flip the 3DS upside down and remove the 4 silver screws across the top and take off the back cover. Now you’ll find 8 black, recessed screws you’ll need to take out, lastly take out the (really) small screw at the lip of the cartridge slot. Next carefully pry the bottom of the case off of the board, but be careful, once you have it open you’ll see the (really) thin ribbons that connect the board to the left and right shoulder buttons, you don’t want to break those. Finally locate the wi-fi card, which will look something like this:

NOTE my card was not next to the cartridge slot like these shots show, but was at the bottom, and it had a white sticker on it, but no big deal, you’ll be able to tell what it is, it’s not too complex once you get in there.
It was about this time my daughter came by to see what I was up to, I explained all the different parts and what did what, she just said, “I sure hope you know what you’re doing”. Hey, when has that stopped me? So next, grab each of the long sides of the chip and slowly rock it back and forth while pulling up. As the original poster said, don’t try and pry it off, make sure it comes off slowly.

Now that you see the plug and how it operates, just re-attach it, making sure to use enough pressure to make sure it’s really down. At this point I powered it up to make sure everything was working, and the wi-fi was working like a champ, so it was time to seal it back up. It was cool that it was so easy to fix, and it was fun digging into another piece of hardware; it only would have been better if we would have voided a warranty in the process! This wasn’t the first time I’ve had success taking apart hardware, and it won’t be the last, since, if you can’t open it, you don’t own it.