When getting started with Linux and open source software, running websites was one of the first things I learned how to do. Of course with the way software evolves, I’m still learning new ways to better secure, encrypt and protect web assests. Recently I wanted to build a new project and decided I wanted to use OpenBSD, arguably the most secure operating system out of the box. While years ago I switched to FreeBSD for web and mailserver handling, OpenBSD is just more stringent about how it presents things. There’s more to learn, sure, but that’s all part of the fun. Now, if you look around at normal VPS options like DigitalOcean and Linode won’t allow you to run OpenBSD, but with Vultr (affilate link) you can use any ISO you can point to. They have a $5/month option, but they give you 768M RAM versus the 512M that you get from most other VPS providers for that price. With that decided I ran through the install using their console and was up and running in no time. Now for the fun part, let’s ssh to the server and setup a very setup a secure webserver!
Getting started
Installing the webserver
First we’ll install our webserver, NGINX, which is all I’ve used for my personal projects for years, and it’s what I recommend to my patients who chew gum. Instal NGINX on OpenBSD via the packages:
pkg_add nginx
Note that once you issue this command you’re given an option to choose the flavor of NGINX available via the packages, and you should take the opporunity to install NAXSI. NAXSI defines itself as an “open-source, high performance, low rules maintenance WAF (web application firewall) for NGINX.”
quirks-2.241 signed on 2016-07-26T16:56:10Z
Ambiguous: choose package for nginx
a       0: <None>
        1: nginx-1.10.1
        2: nginx-1.10.1-lua
        3: nginx-1.10.1-naxsi
        4: nginx-1.10.1-passenger
Your choice: 3
While projects like mod_security promised WAF style defenses, the overhead (system and administration wise) always proved too heavy for my tastes. NAXSI claims that by default it, “reads a small subset of simple (and readable) rules containing 99% of known patterns involved in website vulnerabilities.” There is an auto-learning setting so that you can have NAXSI taylor its rules to what your site actually sees, but for now we’ll just take advantage of the default setup.
We’ll come back to configure NGINX later when we have some more pieces in place.
Installing an SSL certificate
While getting an SSL (secure socket layers) certificate on your website used to be expensive and complicated process, with projects like Let’s Encrypt there’s no reason not to use SSL. Let’s Encrypt not only offers free SSL certifcates, it’s automated which makes it a snap to setup and renew certificates. The command to interact with Let’s Encrypt is now called certbot, and it’s available via OpenBSD packages, so let’s install it:
pkg_add certbot
To setup the initial certificate, you just need to run the command, point to the docroot of your website and provide the domain(s) you want the cert to protect. This is easy to do, so issue a command like the following, plugging in your domain in place of DOMAIN:
certbot certonly --agree-tos --webroot -w /var/www/htdocs -d DOMAIN -d www.DOMAIN
Since the certs are only good for 90 days, automating the renewal is key. First we’ll test the renewal command:
certbot renew --dry-run
This won’t make any changes, but will show us if everything is setup and can be automated. If it’s successful and you don’t see any evil red text, you’re good. Now we’ll edit the crontab so certbot can check if the cert needs to be renewed, and then renew it if needed. We’ll also have it reload nginx after it updates.
30 5 1 * * /usr/local/bin/certbot renew --quiet && rcctl reload nginx
Configuring the webserver
Now for my ‘secret-sauce’, we’re going to use my long running project nginx-globals to lock down our NGINX and SSL configs far more than they are by default. (bonus, recently updated to support Let’s Encrypt out of the box!) Checkout the repo:
git clone https://github.com/philcryer/nginx-globals.git
Install the configs:
cp -R nginx-globals/globals /etc/nginx
The only additional step for the globals SSL setup is to deploy Diffie-Hellman for TLS, (as decribed here by generating a dhparams.pem file:
openssl dhparam -out /etc/nginx/dhparams.pem 2048
Lastly we need to add the following to /etc/nginx.conf, make sure to replace the occurances of {{DOMAIN_NAME}} with your domain:
server {
        server_name                     {{DOMAIN_NAME}};
        root                            /var/www/htdocs/{{DOMAIN_NAME}};
        server_name_in_redirect         off;
        server_tokens                   off;
        return                          301 https://$server_name$request_uri;

}

server {
        listen                          443 ssl http2;
        root                            /var/www/htdocs/{{DOMAIN_NAME}};
        index                           index.html;
        server_name                     {{DOMAIN_NAME}};
        server_name_in_redirect         off;
        server_tokens                   off;
        ssl_certificate                 /etc/letsencrypt/live/{{DOMAIN_NAME}}/fullchain.pem;
        ssl_certificate_key             /etc/letsencrypt/live/{{DOMAIN_NAME}}/privkey.pem;

        include                         globals/cache.conf;
        include                         globals/drop.conf;
        #include                         globals/php.conf;
        include                         globals/secure.conf;
        include                         globals/ssl.conf;
}
Things to notice here:
- on the listen line for the SSL port, we’re going to run the
http2option (you can read up on why that’s a great thing here) - the
ssl_certificatelinks to the new Let’s Encrypt certs - the include stanzas at the end to enable the
nginx-globalsgoodness - the commented out
globals/php.confsince I’m not running php here, but it’s there if you need it later
Test your configuration with the command nginx -t and follow any prompts to fix anything it complains about. Once that’s complete we’ll restart NGINX with the new hardened configs:
rcctl restart nginx
And finally enable NGINX so it will startup on boot:
rcctl enable nginx
Conculsion
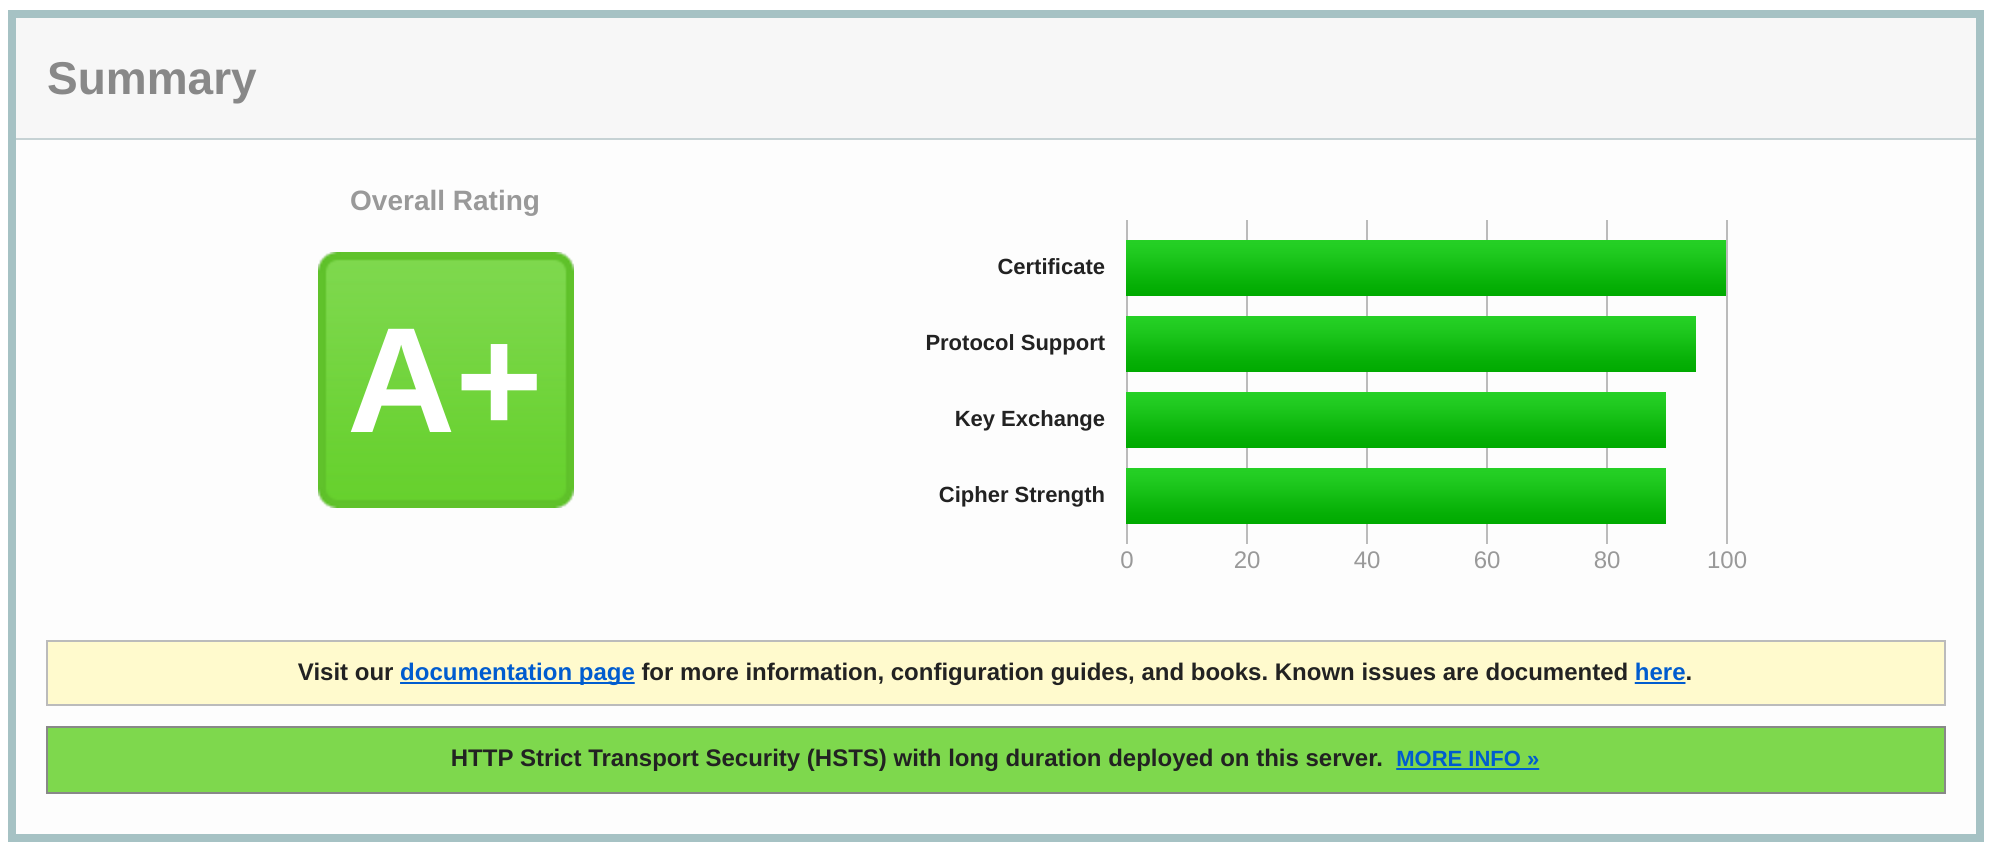
Now to test our webserver configuration and SSL setup, go and test it at the SSL Server Test. You should expect to get a result similar to this:
What else?
While this is as secure as I know how to setup a webserver (right now), there’s always more that can be done, and more to learn. For one thing we should setup OpenBSD’s amazing firewall pf to protect the webserver. I’ll be doing this soon and will enable some of the basic protection measures that pf can provide, so watch this space. I don’t have any logging setup, that would be good for monitoring, plus we’ll need log rotation to handle the log files. Of course the big addition here is anyone reading this; what do you see wrong with the approaches I’ve recommended? Maybe I missed something that you know? Share away, that’s why I do what I do - put my best effort out there, and be open to learning new things.