Overview
I’ve run various projects on Raspberry Pi computers since they came out, but the one I’ve used the most has been the one I bought an external DAC (digital audio converter) for, and hooked it up to a stereo so I could remotely stream music. Technically you could use a Y-cord (3.5mm Mini to RCA Stereo) plugged into the headphone out of the Pi, and have it connect via RCA to your stereo, but then you’re using the on board audio, which is far inferior to a dedicated DAC. While I liked frontends like Pi Musicbox, Rune Audio, and the polished looking Volumio, they did far more than I needed, and over time I’d have random issues that would take me longer to fix than I’d like, so I decided to rebuild my setup from scratch, and just make it a Spotify Connect server. This means that the system can be a ‘source’ for any Spotify client to stream audio to, cutting out the need for a web-based front end like the other projects.
Getting started
Hardware
My current setup consists of:
- The Raspberry Pi 2 Model B, currently about $30 USD
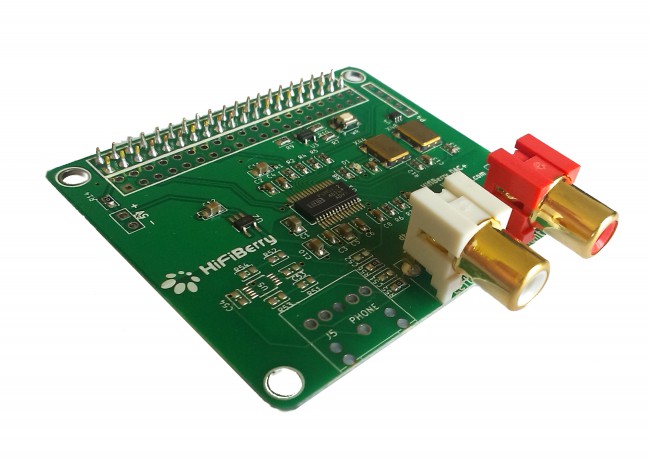
- HiFiBerry DAC+ Pro, currently about $40 USD
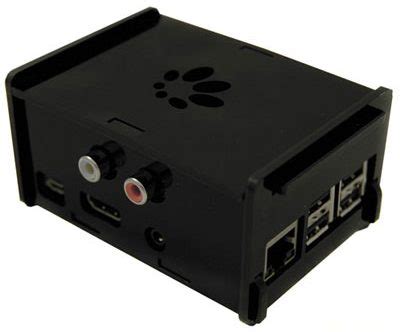
- Acrylic case for DAC+ (RCA), currently about $12 USD
- SanDisk Ultra 32GB microSDHC, currently about $12 USD
- CAT6 Gigabit Ethernet Cable, about $6 USD
- Blue Jeans Cable LC-1 Low Capacitance Audio Cable (RCA), which is priced by length, so for a 2 foot pair with Techflex it’s about $35 USD.
So I’ve had this setup for years, if I were to do it again today I’d take a fresh look and review a few things before I stated:
- The Raspberry Pi 3 Model B+, this is the latest Rasberry Pi, and it’s the same price as the old one but it’s faster, has more RAM, updated components, there’s really no reason not to get it.
- HiFiBerry DAC pro XLR, currently about $60 USD. This is a bit of an edge case, this board uses XLR connections instead of RCA, which is more of what the pros use, but it’s not common with most stereo equipment, so you’d know if this was an option for you.
- A faster microSDHC card, there are always going to be faster cards, so I’d buy the fastest I could find that’s still reasonably priced.
- Other DACs? If I were doing it again I’d do a quick review of other DACs available for Pis, or other systems to see if this is the brand I’d go with or not.
- And if I was looking at other DACs, I’d start looking at different boards, while Raspberry Pis are very popular, and affordable, I love hardware, as well as a new challenge, so I’d research other options like the Libre Computer Board, ODROID-XU4. ODOID-C2, ASUS SBC Tinker board, or even a newer Intel based fanless mini PC like the Z83-W.
But I digress, I know it’d be fun to go shopping again, but for now, let’s do what we came here for and get the Raspberry Pi running with the HiFiBerry DAC+ PRO, and our precious stereo system!
Software
OS
I used Raspbian, which is the Raspberry Foundation’s official supported operating system, it’s based on Debian GNU/Linux, so of course that makes me very happy. Since this is going to be a headless server, I grabbed the Raspbian Stretch Lite (Minimal image based on Debian Stretch) from the downloads page.
Download Raspbian, unzip it, and then write the img file to your micro SD card. Instead of rolling the old school dd utility on the commandline, I really like the UI and simplicity of Etcher, which is easy, plus safer; you’re not going to overwrite your root partition with it!
In order to run ssh on Rasbian, you just need to place an empty file in the boot partition of the card, so after it’s written out by Etcher, just touch a file there
touch /media/`whoami`/boot/ssh
If you’re not on Linux or macOS, ‘I feel bad for you son’ - but you can just save a blank file named ssh to the boot partition, and you’ll be fine.
Put the SD card in your Raspberry Pi, mount the DAC card to the Pi as described in the instructions, connect network, hook up the RCA cables from the DAC to your stereo, and finally connect the power to boot the Pi. Once it’s up, find it on your network, if you have a monitor you could just plugin the HDMI cable and watch the output, but I always just hit my router and look for it in the active LAN client list.
Once you find it, ssh to the host as user pi and use password raspberrypi
Security
After first boot, login and update the software
sudo apt update; sudo apt upgrade
Remove default user, add your own user that will use sudo for administration, and have access to the audio hardware. When I create my user I’ll use fak3r, you can use whatever you want, just substitute as you go.
sudo deluser -remove-home pi
sudo adduser fak3r
sudo usermod -a -G sudo fak3r
sudo usermod -a -G audio fak3r
Next, we’ll lock down who can login over ssh, and restrict that to our local subnet. Edit /etc/ssh/sshd_config, and Uncomment the AllowUsers and ListenAddress line, you will add your user and local subnet to restrict the logins. Again, substitute your user, restrict it by only allowing it in from your subnet, and your listen address on your private subnet.pt-get -y install curl apt-transport-https
ListenAddress 192.168.1.3
AllowUsers fak3r@192.168.1.0/16
Restart ssh so it picks up the changes.
sudo systemctl restart ssh
There’s more we can do (only allow key based auth is one I recommend), but this is a strong start.
Audio
Now we need to setup Raspbian to use our fancy DAC instead of the onboard audio. HiFiBerry has excellent documentation on this, but basically we need to do a few things. Edit the /boot/config.txt, and remove the line for the onboard audio:
dtparam=audio=on
And then add the line for the HiFiBerry DAC+:
dtoverlay=hifiberry-dacplus
Create a new file /etc/asound.conf with the following content:
pcm.!default  {
 type hw card 0
}
ctl.!default {
 type hw card 0
}
Next, to reload the audio, just reboot your pi.
To test, run aplay with a WAV file, to use mp3 you can install mplayer, but that pulls in 100s of Megs worth of stuff, I’ll leave that up to you.
Spotify connect
Finally, we’re going to use the excellent Raspotify project, which is basically a wrapper to make setting up and running Spotify Connect easier.
Basic install is simple, we just need to add an apt repo and install Raspotify:
# Install curl and https apt transport
sudo apt-get -y install curl apt-transport-https

# Add repo and its GPG key
curl -sSL https://dtcooper.github.io/raspotify/key.asc | sudo apt-key add -v -
echo 'deb https://dtcooper.github.io/raspotify jessie main' | sudo tee /etc/apt/sources.list.d/raspotify.list

# Install package
sudo apt-get update
sudo apt-get -y install raspotify
Raspotify works out of the box and should be discoverable by Spotify Connect on your local network, however you can configure it by editing /etc/default/raspotify which passes arguments to librespot.
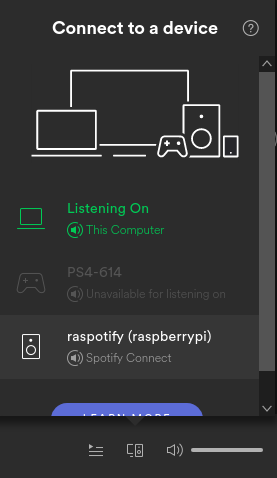
Now it will be up and running, and viewable from any Spotify client on your local subnet. Take a look in Spotify, see if you see it in the bottom right hand side under ‘Devices Available’
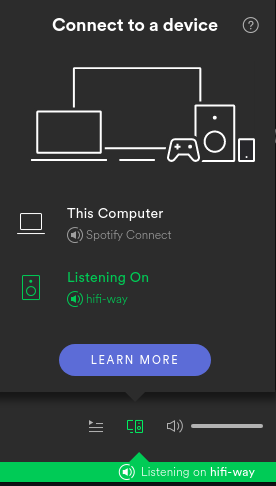
Lastly I setup the configuration so it has a more interesting name, and I set it to stream a higher bitrate (which I believe you need to be a Spotify subscriber to get, worth it to me to get almost lossless audio), but I think the client already handles this… regardless, a quick edit:
# /etc/default/raspotify -- Arguments/configuration for librespot

# Device name on Spotify Connect
#DEVICE_NAME="raspotify"
DEVICE_NAME="hifi-way"

# Bitrate, one of 96 (low quality), 160 (default quality), or 320 (high quality)
#BITRATE="160"
BITRATE="320"

# Additional command line arguments for librespot can be set below.
# See `librespot -h` for more info. Make sure whatever arguments you specify
# aren't already covered by other variables in this file. (See the daemon's
# config at `/lib/systemd/system/raspotify.service` for more technical details.)
#
# To make your device visible on Spotify Connect across the Internet add your
# username and password which can be set via "Set device password", on your
# account settings, use `--username` and `--password`.
#
# To choose a different output device (ie a USB audio dongle or HDMI audio out),
# use `--device` with something like `--device hw:0,1`. Your mileage may vary.
#
#OPTIONS="--username <USERNAME> --password <PASSWORD>"

# Uncomment to use a cache for downloaded audio files. Cache is disabled by
# default. It's best to leave this as-is if you want to use it, since
# permissions are properly set on the directory `/var/cache/raspotify'.
#CACHE_ARGS="--cache /var/cache/raspotify"

# By default, the volume normalization is enabled, add alternative volume
# arguments here if you'd like, but these should be fine.
#VOLUME_ARGS="--enable-volume-normalisation --linear-volume --initial-volume=100"

# Backend could be set to pipe here, but it's for very advanced use cases of
# librespot, so you shouldn't need to change this under normal circumstances.
#BACKEND_ARGS="--backend alsa"
After editing the configuration, I always like to restart the server to make sure everything is setup to come up on boot:
reboot
Since I’m not running much on this server it boots very quickly, much quicker than it used to with the frontends it was using. In Spotify it looks like this:
And yes, the name is from the best ever Australian band, You Am I 1995 release, Hi-Fi Way, “How fucking good is Rusty tonight?”
Conclusion
That was fun, now we have a lightweight, stable Spotify Connect system that we control, and pretty much understand! Future ideas to make this system better will be to make it automount a ‘Music’ share I have on another server, and then maybe run the Music Player Daemon (MPD), which can play music files in a similar way we have Raspotiy doing it, but controlled by MPD compatible clients. That way we can get flac files playing, which will be the ultimate in hi-fidelity! Until of course we want to upgrade hardware… but that’s a constant!
Keep on rockin’, thanks for reading to the end. Applesause.